

 Elegant Rag Doll Tutorial - Part 2
Monday, March 16 2015
Elegant Rag Doll Tutorial - Part 2
Monday, March 16 2015
Creation: Elegant Rag Doll
The Visionary: Katerina, bloglexandliv.com
Our Thoughts: Katerina from bloglexandlive.com made this gorgeous rag doll for her daughter to play with. What a unique and beautiful toy! This is Part 2 of the Doll Series. See Part 1 HERE.

The instructions for the doll are self explanatory. There were one or two instances where I could have done a better job and I’ll go over that too. I’ll also explain how I altered the pattern a bit to remove the raw edge where the body meets the legs, and to make the doll’s hips narrower.
I recommend using vellum paper to trace the patterns, rather than trace, because it is much less likely to tear. Trace over the pattern very carefully. I must emphasize that, on a doll this size, you have to be precise or your pieces won’t come together correctly and the seams won’t match up.

Once you’ve cut out the vellum pieces, you can pin them to the fabric and trace around with a pencil or washable marker (you must dab away the marker with a wet cloth before ironing or it will be permanent). I actually used a few pieces of masking tape rather than pinning but this will also depend on the type of fabric you use; if it’s stretchy or warps when you move it, you should pin it.
First, the two back portion pieces are sewn together, leaving an opening in the back for stuffing the doll. You can see here that I’ve snipped quite a bit into the curved portions for the back of the head. The tighter the curve, the more you should snip, being careful not to cut into the stitches. If you do cut the stitches, be sure to sew back over those stitches forward and in reverse.

After the back portion is sewn, you will iron open the seam and the opening. Use only the nose of the iron to press open the curved seams.

After pressing open the seam, the front and back portions will be pinned and sewn together with right sides facing eachother.

Be sure to follow directions showing you where to reinforce the seams, and don’t forget to snip into the inner arm corners (I think I must have forgotten this part because my doll’s inner arms bunched up a bit when turned out)

Reinforce the inner arm seams and snip the fabric to release the corners
Snipped into the curved portions of the seam allowance.

The legs were self explanatory.

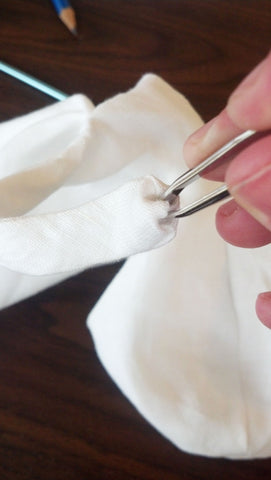
Turn the doll right side out. I had the better part of an hour doing this because of the arms. They are very skinny and my fabric may have been thicker than cotton muslin. I suggest trimming 1/8″ off the 1/4″ seam allowance around the arms to make turning them easier. You’ll likely need tweezers and a bamboo stick/ knitting needle.
This is the point where I deviated a bit from the pattern, which has a simple raw edge along the bottom of the doll’s body, where the legs are sewn. If you want a finished edge, turn the bottom of the doll’s body inside out, as shown in the images below, and insert the stuffed legs facing upwards. Pin them in place and allow them to emerge from the back opening. You will be sewing them place about an inch from the bottom of the raw edge. Make sure the legs seams are facing outwards (or forwards if you want the seam in the back, whichever direction you choose).


I also made another small change to the shape of the body, which had a more triangulated shape in the original pattern. I wanted narrower hips, so I turned the lower portion inside out again and sewed just outside of the legs, as shown below, being sure to sew and reverse stitch over the original stitching at the top. I then trimmed off the excess seam allowance and pulled the legs though the back opening to turn it right side out.

I then followed the directions for stuffing the doll and hand sewing the back opening. I used cotton stuffing. I recommend stuffing with small pieces at a time to prevent a lumpy appearance. This is especially important when stuffing the arms and legs.
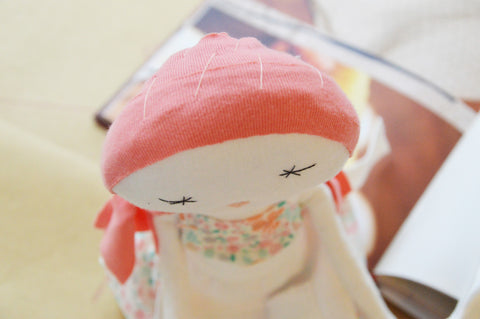
The next step was creating the face. This can be a little intimidating, especially when embroidering the signature starry eyes. I would suggest drawing out the star shape on a piece of trace or vellum first, position it over the face as desired, and use a pin to mark the 6 points through the paper onto the fabric. The holes should be visible for long enough to create the eyes. If not, use the washable marker to mark through the hole you created in the paper. Reverse the paper and do the same for the other side. Wish I had done this as I wasn’t completely satisfied with my doll’s eyes. I also suggest you pull the thread taut when you sew through the back of the head (full instructions in the book). If you pull taut, the embroidery thread will create a little indent which gives the face more character.
I opted to embroider a heart shape for the mouth, rather than sew on a button or piece of felt. If you do this, make sure you pull taut on each side of the mouth or else her smile will be dimpled on one side only.

For the hair piece, I cut organic cotton rib into 1.5″ strips (it does not readily fray) and sewed it on with embroidery thread. I opted to leave the pieces long on each side so that I could braid her hair. For future doll(s), I think I’ll follow the method in the book of using a recycled cashmere sweater and keep her hair short.


1 Comment:


 Same day shipping for most orders
 Questions? Call us toll-free at: 1-855-SEW-PURE

This doll is adorable. Thank you for the tutorial I am going to try to make on for my baby girl tonight.
?