

 Tie Dye Tapestry
Wednesday, November 18 2015
Tie Dye Tapestry
Wednesday, November 18 2015
Creation: Tie Dye Tapestry
Materials Used: White Batiste, Fiber Reactive Dye, Soda Ash
The Visionary: Jaime, here at OCP!
Our Thoughts: Jaime took on a surprisingly simple weekend project of a tie-dye wall tapestry with impressive results!
I wanted to take on a weekend project with some of the incredibly vibrant fiber reactive dyes we carry - I’ve made plenty of T-shirts, and even sweatshirts and leggings with commercial tie-dye kits, so I already had many of the materials at home.
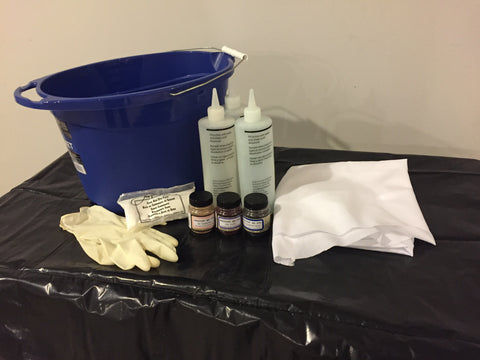
- Rubber gloves
- Rubber bands
- Soda ash
- Bucket or large bowl (for soaking fabric)
- Squeeze bottles (I had these leftover from a previous kit - just be sure to wash them thoroughly before mixing a different color!)
- Fabric - I used 1yd white batiste, but I would probably use something slightly heavier next time..maybe http://organiccottonplus.com/collections/wovens-sateen-percale-sheeting/products/200tc-white-percale-114?
- Dye - I chose Bubble Gum (DYE084), Lilac (DYE192), and midnight blue (DYE079).
Be sure to protect your work surface with painter’s plastic, or a garbage bag as I used. I usually tie-dye outside but seeing as winter is rapidly approaching, I took to my basement and tried my hardest to not splatter color all over the walls.
You should prewash your fabric to maximize dye absorption as well as take care of any shrinkage that might occur. During this time, you can mix up a soda ash solution to soak the fabric in - stir in one cup of the powder per gallon of warm water in your bucket or large bowl.

After washing, you can put the fabric right into the solution (saves drying time.) Let this sit for 20-30 minutes - you can use this time to mix up the dye solutions.

Follow the directions on the dye bottle for mixing - 2 teaspoons per 8oz of water. Of course, mixing in a higher concentration can result in darker shades, and using more water will dilute the solution for more pastel colors.
Measure out the powder and dump it in your squeeze bottle - it helps to use a funnel of some sort (I made a makeshift one out of a piece of paper.) Then add warm water, secure the cap tightly, and shake vigorously. Some colors take quite a bit of effort to dissolve fully.

Next, you can take the fabric out of the soda ash solution (wearing gloves). Wring out as much water as you can - the fabric should be damp, but not wet. Lay the fabric out on your flat, protected surface.

Now for the fun part - manipulate the fabric to produce the design of your choice. I chose to go with a traditional spiral, but you can find plenty of other techniques via a quick google search.
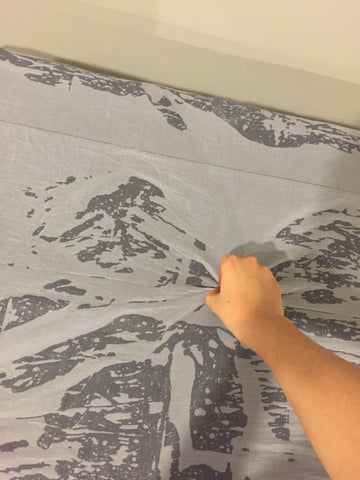
To create a spiral, pinch the fabric between your fingers where you’d like the center to be. Slowly twist the fabric in a circular motion, keeping it as flat as possible, until it can’t go any further. Use three rubber bands to divide this design into six equal sections.

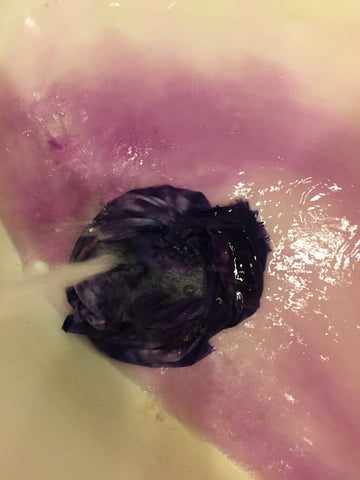
Finally it’s time to make a mess - definitely wear gloves for this! For a traditional spiral, apply one color at a time to one section and the section directly across from it. Be sure to flip over the fabric to apply dye to the other side, as well.
Start with light colors first to prevent muddying, and work slowly..you won’t get dye everywhere like I did if you’re careful not to oversaturate the fabric. That being said, make sure to move folds and wrinkles to minimize white space!

You can see how too much dye causes the colors to run into each other - fortunately, this just makes for new and beautiful shades in between. :)
Once you’re finished applying color, the dye needs to be set for 24 hours. Place your fabric in a plastic bag or wrap it up in Saran wrap and leave it in a cool place.
After a day has passed, the maximum possible amount of dye has been bonded with the cotton fibers. You can rinse the fabric until the water runs clear (or mostly) and then finish by another run in the washing machine - preferably with other tie dyed items, in case you didn’t quite get all of the dye out.
Finally, hang up your design to dry to admire your work!


2 Comments:


 Same day shipping for most orders
 Questions? Call us toll-free at: 1-855-SEW-PURE

I just got your procion fiber-reactive dyes a month ago. I used it to tie-dye clothes I made out of organic cotton from organic cotton plus a few years ago. I posted photos here on facebook: https://www.facebook.com/photo.php?fbid=10204521751073193&set=t.1515483899&type=3&theater
Even the thread is organic cotton thread from organic cotton plus! I love you guys! I may be your biggest fan!
Hey Raederle, Thanks for sharing your beautiful creation with us, it looks wonderful!